MI-8 Mod
Click here for Github releases
Flyout feature mod which adds new ways to interact with existing parts, adds more customisability
Current Version: 2.0.4
Prerequisites
Flyout Melonloader Setup Guide
!! You must have Melonloader in order to run this mod !!
How does it work?

The mod uses the in-game name system on the top right of the editor when you have a part selected
The system uses ‘Keywords’ to identify specific actions & names, upon launching the aircraft (or clicking comma, particularly in the editor) the mod will perform all of the actions.
The specific part you are naming is the part that the actions will happen to, but for keywords like attach children of that part may also be affected
What do you want to do?
Hide & Attach
Hide keyword
The :Hide: keyword is utilised to hide certain details of parts, incase a user prefers to fully swap how a functional part looks.
This is the main benefit of Mi8 mod, as Flyout does not have in-built functionality to hide every single part yet.
Hiding::Hide: When applied onto anything, if the mod supports it, its visual parts will be automatically hidden.
Advanced :Hide:GFace: In this example, its using a keyword as it cannot identify what specific thing you want to use it for, in this case, hiding the background/face of a gauge.
Attach keyword
Attach keyword is used to attach parts onto elements previously not attachable in the past, all you need is one of the keywords below.
Attaching::Attach:Rotor: When applied on a helicopter rotor, any parts that are placed on the rotor will attach to the blades.
Advanced Attaching / Combo: :Hide:Attach:Rotor: In this example, it will also hide the visual parts of the rotor and attach the pieces placed on the rotor to it.
Keyword / Functionality Table
Compatible/Keyword Required
Incompatible
Automatic (Only Action needed)
| Keyword | Explanation | Attach | Hide |
|---|---|---|---|
| Engine-Related | |||
Rotor |
Hides or attaches to a helicopter rotor | ||
Prop |
Hides or attaches an aircraft propeller | ||
Hub |
Hides a propeller hub | ||
Turbine |
Hides a jet turbine (also used for pseudo Yak-38 nozzles) | ||
Ramjet |
Hides a ramjet | ||
Nozzle |
Hides 2D/3D/Regular Nozzle. Also attaches to 2D/3D Nozzle | ||
| Weaponry | |||
Missile |
Hides AGM & IR missile parts. However if doing a custom missile with the LAMP mod this is not needed! | ||
Gun |
Hide / Attach to the gun. Can be used to replace gun models or rotate custom nozzles with the gatling | ||
| Cockpit/Instruments | |||
Cockpit |
Hides Jimmy | ||
Controls |
Hides Jimmy’s controls | ||
GFace |
Hides the background of the gauge, including numbering & plate | ||
GNeedle |
Hides the needle of a gauge. Can also attach child objects to it | ||
| Uncategorised / General | |||
Joints |
Hides Joints | ||
BasicWheel |
Attaches to a rotating part of a regular wheel (no suspension) and/or hides | ||
Rim |
For the above, hides just the rim, for attaching to wheel at same time use Hide:Attach:Rim:BasicWheel: |
||
Backside Backface |
Removes the black part of fuselage, good for first-person drone cockpits | ||
| Technical
Technical keywords incase there is a part that doesn't have a keyword above yet. |
|||
TECHNICALgfx |
Hides all MeshRenderer under gfxCan be used for: Turbochargers, Basic Wheels |
||
TECHNICAL_gfx |
Hides all MeshRenderer under _gfxCan be used for: Piston Engines, |
||
TECHNICALRegardless |
Hunts and removes every MeshRenderer under a part. Used to hide HUD walls & glass Can be used for: HUD |
||
Raycast Landing Gear Experimental
For these keywords to function CustomRCLG keyword MUST be included on the landing gear, otherwise none of these keywords will initialise
Hide keywords are placed alongside the CustomRCLG on the landing gear while Att must be placed on the part that is attached to CustomRCLG
| Keyword | Explanation | Attach | Hidden |
|---|---|---|---|
AttHinge |
Attaches this object to the hinge so that it rotates with the landing gear | ||
AttHub |
Attaches this object to the wheel hub so that it yaws and moves with suspension | ||
AttWheel |
Attaches this object to the wheel so it spins with the wheel | ||
AttPiston |
Its like attaching to the hub, but it doesn’t rotate, allowing for fake pistons | ||
HideLinkage |
Hides Linkage | ||
HideWheel |
Hides Wheel | ||
HideShaft |
Hides Shaft |
SoundSwap
What does it do? How does it work?
The purpose of SoundSwap is to allow users to customise how their individual Flyout aircraft sound. Allowing for more accurate engine/gun sounds and audio from speakers.
Example
F404 & F110-129 sound swap pack courtesy of Stix, download available on Flyout Dev discord
Embed unavailable, thanks discord.
How to use
In my example I will be showing me swapping a speaker’s sound with a song (Frank Sinatra’s Fly Me To The Moon)
A. Place part on the part that they want to swap the sound of, I recommend cube or sphere but other options are fine
B. Name that child part ‘SoundSwap’ and then give it an identifier, in my example I am going to use ‘SoundSwapFrankSinatra’ Image on the right shows how it should look
Identifiers are not case sensitive

C. Add Sound_Source folder to the craft’s folder
D. Add another folder, this will be named after the identifier that I am using (FrankSinatra) so that the system can detect it

E. Refer to table below, depending on what your part is you may have many sounds you can change, to follow with indexing all sound files will be named a number and have to be a .WAV format (Not just any, currently specifically one exported with Audacity for whatever reason)
Another note is you can swap some sounds if you want, you don’t have to change everything
| Part | Swappable Sounds |
|---|---|
| Piston Engine | 0: Idle 1: Low 2: Mid |
| Turbine Engine | 0: ABRear 1: DistantAB 2: DistantRear 3: MediumRear 4: IdleRear 5: IdleFront 6: IdleFront (1) 7: IdleFront (2) 8: DistantFront 9: Intake 10: Buzz 11: CompressorStall |
| Speaker | 0: Sound |
| Propeller | 0: Propeller Sound |
| Rotor | 0: Rotor Low 1: Rotor High |
| Tail Rotor | 0: Tail Rotor |
| Gun | 0: Gun Main 1: Gun Bullets 2: Gun Motor 3: Gun End |
Speaker only takes one sound, so I will name mine 0 and put it in the folder
In-game it will be automatically applied, if you want to change a sound mid-flight just click Comma or restart flight
PBR
This feature of Mi8 allows for modded parts to take advantage of PBR materials, an example of this would be InvalidCrow's AIM-120 that features normals among other details. This can be used for keeping good performance while maximising visuals, and doing things previously not possible in Flyout.
How HDRP handles materials:
Most users of programs such as Blender will be familiar with 'Base Colour', 'Metallic', 'Roughness', 'Normal' among other texture maps. However the way that Flyout handles these, with the Unity HDRP graphics, is through 'Base Colour', 'MaskMap', 'Normal' maps
This means that the creation of PBR for Parts is alot more involved, requiring some extra steps to convert metallic and roughness to a maskMap, however you can skip this if you just want Normals
How do I do MaskMap:
Do you use Substance Painter?
Congrats, this is a non-issue for you, just select 'Unity HD Render Pipeline (Metallic Standard) from the Output Templates'

If you do not, then there is two methods!
1. If you have unity installed, setup a HDRP scene and use this handy tool https://github.com/saltario/mask_maker
This tool greatly simplifies everything, but requries Unity to be launched consistently.
2. Manual composition, using a program like GIMP, mask maps consist of the follow Metallic (Red), Ambient Occlusion (Green), Detail Mask (Blue), Roughness Map (Alpha), so include the specific map in their respective channel, its fine to omit ones here if you want anything specific.
Further reading on Unity Documentation
I did all this / I just want to get my PBR imported in-game
Place a folder named after your specific material in your aircraft's parts, fill it with your Base.png, MaskMap.png, Normal.png, these naming conventions MUST be respected.
⚠️ A normal map, even if pretty much just a blank normal, should be included.

In your modelling program of choice, rename the PBR'd mesh to :PC:YourFolderName: the mod will convert the first material to what is in the folder.
⚠️ In future versions of Mi8, it is intended for :PC: to just assign PBR based on Folder Names, documentation will be updated when it is included, this technique would still be supported as legacy.

I want alpha / opacity
Instead of utilising :PC: you may take advantage of :PCA: (Alpha), good for cut outs like trees, or :PCO: (Opacity), good for details that just need to be see-through.
Custom Jimmy Inverse Kinematic Positioning
Inverse Kinematics is a system used to dynamically animate things based on positions/rotations, Flyout uses this system for Jimmy and with 1.1.6 a new feature allows for forcing the position of this IK elsewhere.
Usage
Name a part with any of these, and that relevant IK will copy its position & rotation, fine tune with Comma in editor (attach no longer works in editor so don’t worry about losing progress)
| Keyword | Affected |
|---|---|
IK:leftHand & IK:rightHand |
Jimmy’s hands |
IK:leftFoot & IK:rightFoot |
Jimmy’s legs |
IK:headControl |
Jimmy’s head (often unreliable) |
Overheat & Magazines
Custom magazines with basically no caliber / count limitation
Adjusting maximum gun overheat
Overheat:Max:
Swap max out to change the overheat limit, I recommend a high value like 50000000, but nothing too high as it can cause issues
Example: Overheat:50000000: which should make any gun last a long time
Adding magazine to any part
Mag:Caliber:Count:
Swap caliber out for gun's caliber, and count for how much ammo you want
Example: Mag:30:15000: which makes 15000 rounds of 30mm
Lightswap
Steal the material of a light strip and apply it on another material
Applying lightswap to any part
Name a light strip 'Lightswap' and place any object on it, the first material will have the light's material assigned to it and function just like it.
Other
:SetVolume:[number]:
Sets the buoyancy of a part in, useful with invisible spheres for making seaplanes viable.
Example: :SetVolume:5:
:Vapourless:
Disables vapour on wing parts, if used strategically this can be used for custom vapour patterns by disabling it on certain wing pieces.
:Liftless:
Disables lift on wing parts, this will also disable Vapour because it relies on lift, useful for custom suspension.
World Object Extensions
This section covers the user-end of the WOE mod, including carrier proceedures, ground & air to air refueling
Do note, all of these require WOE-Compatible world objects, such as the carriers available on my thread.
Aircraft Carrier Operations
Aircraft carrier CATOBAR operations are possible through the WOE module installed by default on Mi8.
Catapult
[Power]PlayerLaunchBar
On a part, often advised near or on the frontal landing gear, apply the above keyword, with [Power] replaced with a number, I recommend trying 50 as a starting point. i.e: 50PlayerLaunchBar
Usage
1. The first step requires yourself to align yourself to the front of a catapult
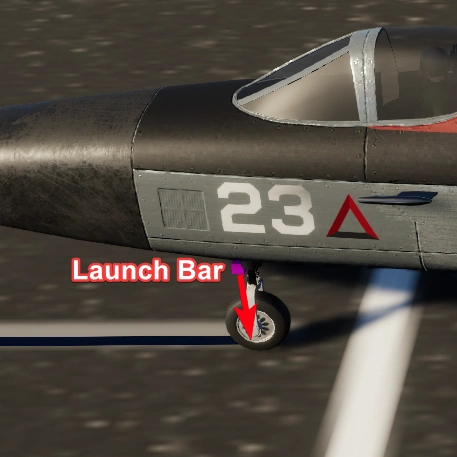
2. Once you do this, you must press shift (Your WOE mod modifier bind) and slash (/) (Your launch/dettach bind), this will stop your plane in its tracks
3. Accelerate, do pre-flight surface checks and when you are ready press the combination once again, your aircraft will be shot away by the catapult.
Carrier Hook
PlayerArrestorHook
Place this keyword on a part which will be attached to the hook, as this will snare the wire on the carrier, to prevent destruction on collision, uncollidable helps.
Usage
Without getting into any details about how you actually would be landing on a carrier, once this part's center passes through a wire, and the speed of the craft is sufficent, it should attach onto the part and slow your aircraft down.
Finally, to dettach you can utilise shift (Your WOE mod modifier bind) and slash (/) (Your launch/dettach bind)
Rebinding Keys
As part of the 1.1.0 update, users now can head to UserData/Mi8Mod.cfg and edit the binds, if you want a list of Keyboard/ definitions
https://discussions.unity.com/t/list-of-all-inputcontrolpath/909946/10
autoTrigger happens on flight launch when your plane loads in, once triggered it is like pressing comma.